SDR PHY » History » Revision 28
« Previous |
Revision 28/32
(diff)
| Next »
fixeria, 08/10/2018 08:40 PM
SDR (Software Defined Radio) hardware
- Table of contents
- SDR (Software Defined Radio) hardware
Unlike the obsolete Calypso based phones, SDR has many advantages, providing much more freedom for the implementation of mobile side GSM protocol stack. This page describes all steps required for running the higher layer (L2&3) applications (e.g. mobile or ccch_scan) on SDR hardware.
SDR PHY vs Calypso
What's so special about SDR?
- General purpose hardware
- i.e. not limited to any particular technology and/or protocol stack,
- could be used as PHY for GSM, LTE, IEE802.11, GPS, Bluetooth, etc.
- Becomes cheap and available for everyone
- e.g. RTL-SDR, LimeSDR-Mini
- Becomes even smaller than a credit card
- e.g. XTRX
- Open Source friendly
- GNU Radio, GQRX, OpenBTS, OsmoTRX, srsLTE, etc.
- some drivers, firmware and PCB schematics are available
Advantages over Calypso
- No need to rely on a 'black box' DSP
- No hardware availability problem
- No reverse engineering required
- No freq. band limitations
Disadvantages
- Low output power
- General purpose hardware
- No screen, no keyboard,
- No built-in SIM reader,
- No built-in audio
- etc.
What is it for?
- Another hardware platform for OsmocomBB
- 100% Open Source GSM L1 implementation
- GSM TS 05.02 scheduling
- GSM TS 05.03 channel coding
- GSM TS 05.04 (de)modulation
- GSM TS 05.10 synchronization
Supported SDR hardware
At the moment only USRP hardware is supported via UHD driver. This limitation caused by the requirement of the stream tags support.
The current implementation is known to work on the following devices:
- USRP B2X0, including 'mini'
- Fairwaves UmTRX
Note: LimeSDR is not (yet?) supported exactly because the stream tags are not supported by gr-limesdr.
Software installation
The signal processing part is based on GR-GSM (https://github.com/ptrkrysik/gr-gsm) project, which is represented by a set of GNU Radio blocks for GSM. So, first of all you need to install GNU Radio with compiled-in UHD driver support.
1. UHD driver
Follow the "Installing and/or Building UHD" section of official project documentation. After the installation, make sure that your device is recognized properly:
$ uhd_find_devices
$ uhd_usrp_probe
2. GNU Radio
Despite GNU Radio is available as a binary package on some distributions, we recommend to build the latest release version from source. Please follow the corresponding building guide.
During the build configuration process, make sure you have the following components:
- python-support
- gr-digital
- gr-filter
- gr-blocks
- gr-uhd
For binary or already installed builds, use the following command to get build info:
$ gnuradio-config-info --enabled-components
3. GR-GSM transceiver
The transceiver implementation is a part of the master branch of GR-GSM now. The information about installation process and list of dependences can be found in the project's wiki. We also recommend to build it from source:
# Get the source code
$ git clone git://git.osmocom.org/gr-gsm
$ cd gr-gsm/

# Configure and compile
$ mkdir build
$ cd build
$ cmake ..
$ make

# Install
$ sudo make install
$ sudo ldconfig
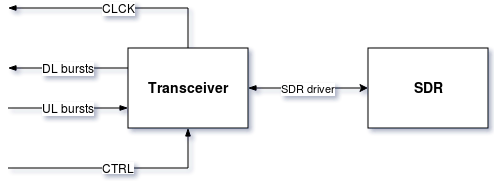
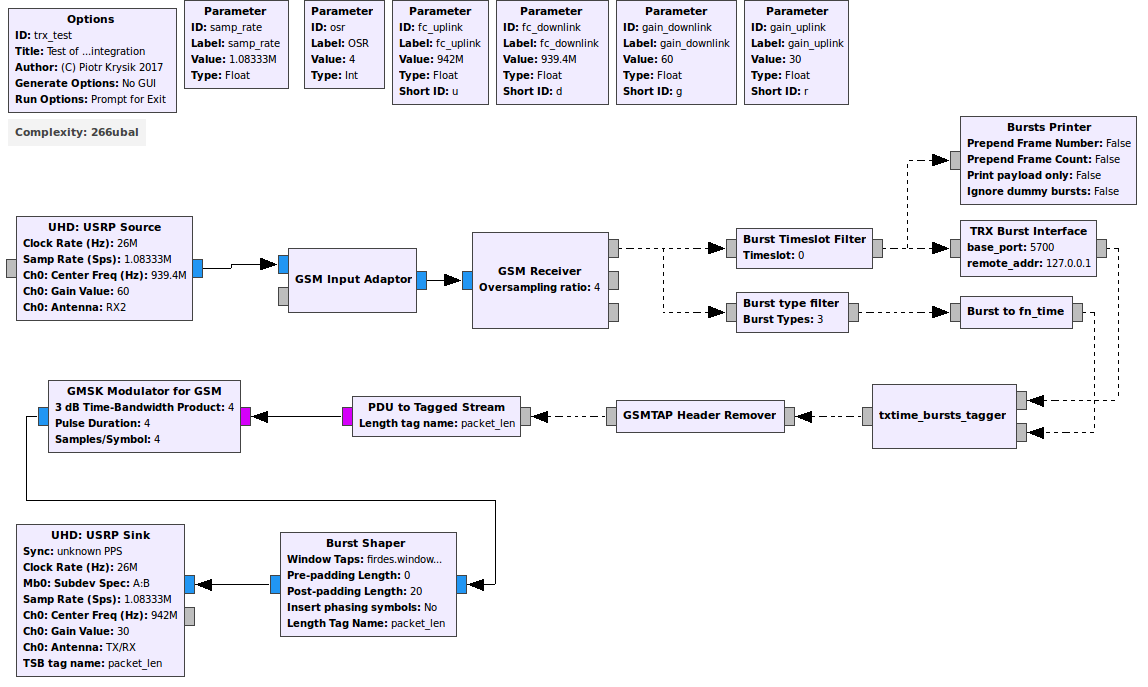
The transceiver logic is represented by the following flow graph:
4. OsmocomBB
You need to compile OsmocomBB with the TRX interface support. Please refer the corresponding wiki page.
Running
First of all, please see known limitations.
Hardware preparation
You need to have two antennas connected: one for RX, another for TX. Both antennas should be chosen for a proper frequency band, otherwise the distance will be limited. Also, it's strongly recommended to use a band-pass filter for TX in order to avoid interference.
Note: There is a bug of USRP B2X0 hardware, which affects the burst transmission quality. It appears when both transmission and reception are performed of the same side of device. To mitigate this, please use an attenuator or antenna with some resistance between the active pin and ground.
Finally, connect your SDR hardware and make sure it's working.
Transceiver
Check available configuration options:
$ grgsm_trx --help

...

  TRX interface specific
   -i --remote-addr  Set remote address (default 127.0.0.1)
   -p --base-port    Set base port number (default 5700)

  Radio interface specific
   -a --device-args  Set device arguments
   -s --sample-rate  Set sample rate
   -g --rx-gain      Set RX gain (default 30)
   -G --tx-gain      Set TX gain (default 10)
      --rx-antenna   Set RX antenna (default RX2)
      --tx-antenna   Set TX antenna (default TX/RX)
      --ppm          Set frequency correction (default 0)
If you already have another transceiver runing, e.g. OsmoTRX, choose a different TRX base port. Keep in mind that a single transceiver process occupies six UDP ports at the same time.
Choose proper RX / TX antennas and corresponding gain values depending on your device. TX gain requires more attention and should be set depending on your environment and antennas used. Feel free to use a spectrum browser, such as GQRX or osmocom_fft, for measuring the proper values.
PPM value is typically measured at runtime, so no need to specify it manually.
$ grgsm_trx --rx-gain 30 --tx-gain 80
linux; GNU C++ version 4.8.5; Boost_105500; UHD_003.010.002.000-0-122bfae1

License GPLv2+: GNU GPL version 2 or later <http://gnu.org/licenses/gpl.html>
This is free software: you are free to change and redistribute it.
There is NO WARRANTY, to the extent permitted by law.

[i] Init Radio interface
-- Detected Device: B200
-- Operating over USB 3.
-- Initialize CODEC control...
-- Initialize Radio control...
-- Performing register loopback test... pass
-- Performing CODEC loopback test... pass
-- Setting master clock rate selection to 'automatic'.
-- Asking for clock rate 16.000000 MHz...
-- Actually got clock rate 16.000000 MHz.
-- Performing timer loopback test... pass
-- Setting master clock rate selection to 'manual'.
-- Asking for clock rate 26.000000 MHz...
-- Actually got clock rate 26.000000 MHz.
-- Performing timer loopback test... pass
-- Asking for clock rate 26.000000 MHz... OK
[i] Init CTRL interface
[i] Init complete
At this step transceiver is ready.
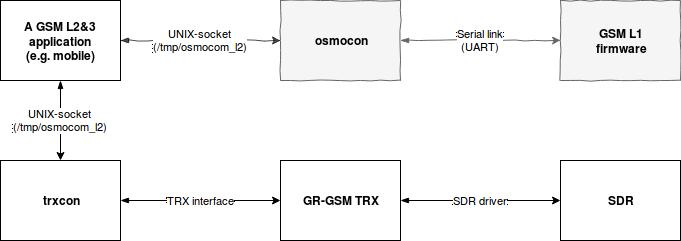
The trxcon application
As we don't use Calypso-based phones, the osmocon application is useless here. Instead, you need to run another application called trxcon. You should use the same TRX base port as specified to transceiver.
$ cd osmocom-bb/src/
$ host/trxcon/trxcon

License GPLv2+: GNU GPL version 2 or later <http://gnu.org/licenses/gpl.html>
This is free software: you are free to change and redistribute it.
There is NO WARRANTY, to the extent permitted by law.

<0001> l1ctl_link.c:235 Init L1CTL link (/tmp/osmocom_l2)
<0003> trx_if.c:646 Init transceiver interface
<0005> sched_trx.c:112 Init scheduler
<0000> trxcon.c:277 Init complete
See help details.
L2&3 applications
At this step you should be able to run the higher layer applications.
For example, run ccch_scan:
$ cd osmocom-bb/src/
$ cd host/layer23/src/misc/
$ ./ccch_scan -i 127.0.0.1 -a <ARFCN>
It should synchronize with a BTS on specified ARFCN, and start decoding BCCH messages.
Docker images
It's possible to run the software in Docker containers. This way is recommended for beginners.
Note: at the moment, there is a build script for GR-GSM TRX only.
The build script for GR-GSM (i.e. Dockerfile) is shipped as a part of a separate project called "docker-playground". It's based on "base/archlinux" image, which provides the recent versions of both UHD and GNU Radio without tons of dependencies such as Xorg, GTK, fonts, etc.
Building Docker image
You need to clone the "docker-playground" repository first:
$ git clone git://git.osmocom.org/docker-playground/
Then make sure you have stable Internet connection and enough disk space, and start building:
$ cd docker-playground/
$ cd gr-gsm-master/
$ make build
It will take a while...
As soon as the building process is finished, you should see the new images:
$ docker image ls
REPOSITORY                TAG                 IMAGE ID            CREATED             SIZE
user/gr-gsm-master        latest              c5912ee7d6ae        About an hour ago   2.09GB
base/archlinux            latest              7477438791e3        28 hours ago        689MB
Please note that this container requires privileged access to the host USB devices (USRPs).
Running Docker image
Read the above part about running first.
As soon as you build the image, feel free to start it:
$ cd docker-playground/
$ cd gr-gsm-master/
$ make run
The last command will drop you into a bash shell. As there are no build scripts for the higher layer applications of OsmocomBB, the following part assumes that you are running OsmocomBB on the host side.
By default, Docker should create a network interface for interacting with containers:
$ ip addr
# ...
5: docker0: <NO-CARRIER,BROADCAST,MULTICAST,UP> mtu 1500 qdisc noqueue state DOWN group default
    link/ether 02:42:13:85:c2:c9 brd ff:ff:ff:ff:ff:ff
    inet 172.17.0.1/16 scope global docker0
       valid_lft forever preferred_lft forever
In this example, the host has 172.17.0.1 assigned. Remember this address.
Note: make sure your firewall doesn't block the connections with Docker's interface.
The container itself should also have it's own address. You can check it:
[root@f7e86148c1c2 tmp]# pacman -S net-tools
[root@f7e86148c1c2 tmp]# ifconfig
eth0: flags=4163<UP,BROADCAST,RUNNING,MULTICAST>  mtu 1500
        inet 172.17.0.2  netmask 255.255.0.0  broadcast 0.0.0.0
        ether 02:42:ac:11:00:02  txqueuelen 0  (Ethernet)
        RX packets 40  bytes 139097 (135.8 KiB)
        RX errors 0  dropped 0  overruns 0  frame 0
        TX packets 32  bytes 2752 (2.6 KiB)
        TX errors 0  dropped 0 overruns 0  carrier 0  collisions 0

lo: flags=73<UP,LOOPBACK,RUNNING>  mtu 65536
        inet 127.0.0.1  netmask 255.0.0.0
        loop  txqueuelen 1  (Local Loopback)
        RX packets 0  bytes 0 (0.0 B)
        RX errors 0  dropped 0  overruns 0  frame 0
        TX packets 0  bytes 0 (0.0 B)
        TX errors 0  dropped 0 overruns 0  carrier 0  collisions 0
Now, make sure your hardware is available within the container:
[root@f7e86148c1c2 tmp]# uhd_find_devices
# Device list will appear here
And finally, start the transceiver:
# You need to use IP address of the host
[root@f7e86148c1c2 tmp]# grgsm_trx --remote-addr 172.17.0.1
and trxcon on the host side:
$ cd osmocom-bb/src/host/trxcon/trxcon/

# You need to use IP address of the host
$ ./trxcon --trx-ip 172.17.0.2
That's it!
Related pages
Project status
Known limitations (not implemented):
- Automatic PHY delay measurement
- AGC (Automatic Gain Control)
- Power measurement
Work in progress:
- Docker scripts (Dockerfiles)
- GAPK based audio back-end
- TCH/H implementation
- Frequency Hopping
Future plans:
- Extend supported hardware list (Soapy?)
- PC/SC physical SIM interface
- AMR (Adaptive Multi-Rate)
Further reading / watching
https://media.ccc.de/v/34c3-8952-running_gsm_mobile_phone_on_sdr
https://www.youtube.com/watch?v=nmqzr2-yF04
Updated by fixeria almost 6 years ago · 28 revisions

