- Table of contents
- Pirelli DP-L10
Pirelli DP-L10
The Pirelli DP-L10 is a tripleband GSM/Wifi VoIP dualmode phone, which was developed by Pirelli Broadband Solutions and manufactured by Foxconn.
It was branded and sold by quite a few operators:
- Pirelli DP-L10
- Arcor Twintel DP-L10
- Telekom TC-300
- sipgate Pirelli Discus DualPhone DP-L10
- free.fr Black
- Cubic Mobile DP-L10
- Tovo t450g
- Eurotef-M
The phones are still available as new at various places like eBay, Pollin or rebelsimcard.com.
For more information on the original firmware see the ip-phone-forum wiki (german).
Hardware
- CPU/DBB: TI Calypso (D751992AZHH)
- ABB: TI Iota (TWL3014)
- GSM Transceiver: TI Rita (TRF6151)
- PA: SKY77328-13
- Flash/SRAM: Spansion S71PL129NC0 128MBit/64MBit
- Wifi: Marvell 88W8385 802.11 MAC
- Marvell 88W8015 802.11b/g transceiver
- Winbond W56940 ringtone chip
- Sunplus SPCA552E multimedia controller
- LSI-65194A1 ASIC (seems to be a DSP for VoIP en-/decoding)
- Silabs CP2102 USB UART (connected to UART_IRDA of the Calypso)
PCB
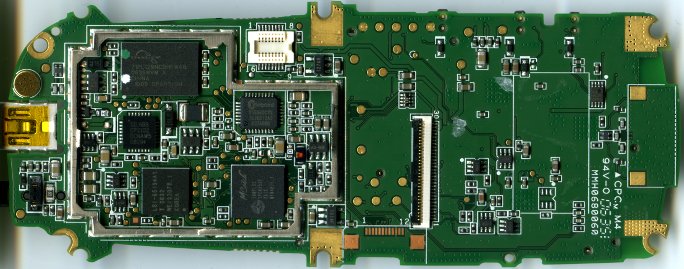
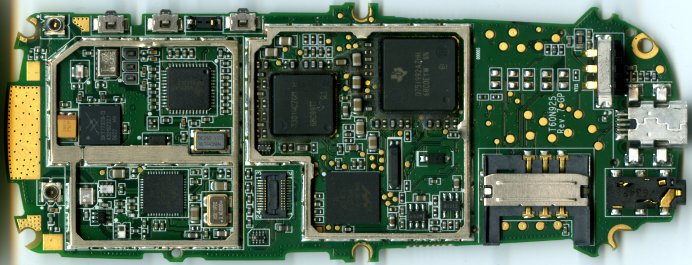
The pcb is labelled with "T60N925", and the Foxconn internal project name seems to be "T60N925.00".
There are no schematics of this phone, however, steve-m has grinded down one of those boards, see the pictures of all layers here or locally at PirelliDPL10PCB.
RF path
Since this phone is a tripleband design, it uses 3 rx filters, connected to the respective Rita inputs:
- Epcos B7820 for GSM900
- Epcos B7821 for DCS1800
- Epcos B7851 for DCS1900
Those are connected to an unknown "T 636 / 5475" antenna switch. The pinout of this switch however is identical with the Panasonic EZFL897TB11C.
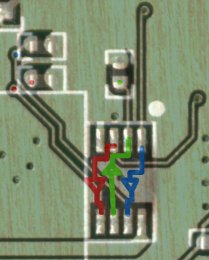
The control voltage inputs of the switch are connected to the TSPACT outputs of the Calypso DBB through a Fairchild NC7NZ34 triple-buffer.
Phone as clock generator
The idea to use an OsmocomBB-driven phone as an accurate clock source, e.g. for the USRP, by synchronizing the clock to a cell of a commercial operator was discussed on the mailing list a while back. Since the USRP needs an input clock of 52MHz, but the Compal-phones only expose 13 and 26MHz, an external PLL would be required. The DP-L10 however exposes the MCLK/TSPACT11 pin of the Calypso, which is connected through the triple-buffer to the GSM900 TX/Vc3 input of the antenna switch, and thus easily accessible. When the corresponding bit in the MCU_SW_TRACE register is set, this pin outputs the 52MHz clock being fed to the ARM-core, which is phase-locked to the VCTCXO. See the blue circuit path in the picture above.
This is the output captured with a 100MHz scope (and thus limited):
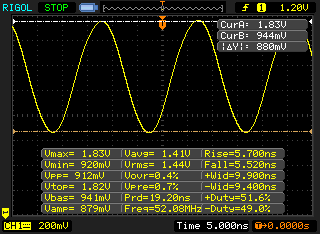
After synchronizing to a cell with the phone, the frequency error measured by the DSP is in the 0-10Hz range.
USB/Serial converter
A nice feature of this phone is that it already has an integrated Silabs CP210x USB-UART, which is supported by Linux. Even faster, odd baudrates of the Calypso DBB are supported by this chip, including the maximum 812.500 baud.
Most of the phones seem to use USB vid:pid 0489:e003, which is mainline since Linux 2.6.36 (thus, older kernels need to be patched, the cp210x driver doesn't seem to take the vid/pid via modprobe parameters).
As someone pointed out on the mailing list, you can do the following for Kernels < 2.6.36:
# modprobe -v cp210x
# echo "0489 e003" > /sys/bus/usb-serial/drivers/cp210x/new_id
The DP-L10 has the CalypsoRomloader enabled.
JTAG
All JTAG lines, as well as the second uart (UART_MODEM), go to the unpopulated connector next to the display connector.
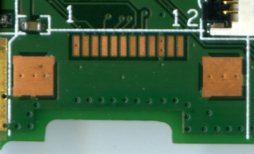
| pin | signal |
|---|---|
| 1 | Vcc |
| 2 | RX_MODEM |
| 3 | TESTRSTz (Iota) |
| 4 | TDI |
| 5 | TMS |
| 6 | TCK |
| 7 | TX_MODEM |
| 8 | TDO |
| 9 | |
| 10 | GND |
| 11 | |
| 12 |
State of support
The code which adds support for the Pirelli DP-L10 can be found in master.
What works:- RX/TX in GSM900 and DCS1800, PCS1900
- audio path
- SIM-reader
- keypad, keypad backlight
- Display with backlight
- pretty much everything else, except Wifi, ringtone generator, camera and the VoIP accelerator ASIC
Note: As the power button is not connected to the keyboard scan matrix and can only be read through a Iota status register, which is quite impractical, we use the camera button on the top left side of the phone as a substitute.
Loading procedure
Due to the fact that the phone has a USB charging mode, loading osmocomBB is a bit more complicated:
- remove the battery
- plug in USB cable
- start osmocon, for example:
./osmocon -p /dev/ttyUSB0 -m romload ../../target/firmware/board/pirelli_dpl10/layer1.highram.bin
- put in battery and the code is being loaded. If it should abort, remove the battery, kill osmocon and resume from step 3.
Without removing the battery the following procedure is possible (without SIM, but it takes longer):
- plug in USB cable, the USB charging mode will start
- press and hold the power button, the phone will boot and show "Insert SIM"
- start osmocon
- press and hold the power button, the phone will power off
- the code is being loaded (because after the poweroff Iota triggers a poweron due to the "Charger inserted"-condition, which executes the bootloader)
When osmocom is alreday running on the phone and you want to reboot/load an updated version/different application, do the following:
- kill osmocon and start it again
- press the camera button on the side to power off the phone
- the code is being loaded (due to the fact mentioned above)
Stock firmware notes
Below are some notes related to the stock Pirelli's firmware.
MMI codes
Luckily for us, ###000# shows the list of available codes and a brief description for each of them:
*36446337464#- Not use now*#2003#- Vibration On/Off*#3692666#- Testing mode*#3547#- Not use now###000#- Show this help screen###09000#- Log script On/Off###09010#- Timer Log script On/Off###4444#- Super reset###520#- Display version number###600#- Enable Call Deflection###601#- Disable Call Deflection###777#- Enable test SIM (00101) incoming call auto accept###778#- Disable test SIM (00101) incoming call auto accept###800#- Enable engineering mode###801#- Disable engineering mode###810#- Remove user data###888#- Not use now###999#- Enable power on CF status check###989#- MBK libray Demo
(These codes can also be found in a firmware dump at offset 0x005f9b70)
(Also, here is a list in Spanish: https://web.archive.org/web/20100331121723/http://www.voipnovatos.es/item/2007/09/cdigos-modo-ingeniera-tcom-tc-300)
OTA Firmware Update
The OTA (Over-the-Air) firmware update is described here:
Here is a brief summary:
- Download the firmware image. The article mentions this one:
$ wget https://web.archive.org/web/20071012212107/https://www.sipgate.de/downloads/pirelli/Firmware.zip
$ unzip Firmware.zip
$ sha256sum Firmware.zip Firmware/PU_D910.0.3.98f_PG1.img
8fda319797c45313d98e3cf95f3755002c8a157184aa7ba7251855bd36ff17f8  Firmware.zip
b160602d46d483b3703c55af5d57b439013b23546c08e6635b95f8a395df7dc4  Firmware/PU_D910.0.3.98f_PG1.img
- Create a file named
T60N925.00_FOX-general.cfgwith the following content:- Replace
192.168.1.231with IP address (not sure about DNS) of your HTTP server;- The server must be running at port
80, the firmware does not seem to accept other port numbers;
- The server must be running at port
- Replace
PU_D910.0.3.98f_PG1.imgwith filename of the firmware image you want to flash;- Make sure both the firmware image and this file is in the same directory;
- Replace
[Provision]
SERVER=192.168.1.231
BACKUP_SERVER=twintel-fw.arcor.de
FIRMWARE_FILENAME=PU_D910.0.3.98f_PG1.img
- Start an HTTP server at the configured host. You can use Python's HTTP module:
$ sudo python -m http.server 80
Serving HTTP on 0.0.0.0 port 80 (http://0.0.0.0:80/) ...
- Enable the engineering mode on the phone by entering
###800#(you should see "Engineering mode Activated"). - Go to "Menu" / "Settings" / "Provision config":
- Select "Server address" and enter the address of HTTP server hosting
T60N925.00_FOX-general.cfg(like "192.168.1.231"); - Select "Settings" and choose "Once".
- Select "Server address" and enter the address of HTTP server hosting
- Go back to the main screen and wait a while, the phone will initiate firmware update check on its own:
Serving HTTP on 0.0.0.0 port 80 (http://0.0.0.0:80/) ...
192.168.1.185 - - [10/Jan/2024 02:01:04] "GET /T60N925.00_FOX-general.cfg HTTP/1.1" 200 -
- The phone will offer to download the firmware image, you know what to do here.
- Downloading takes a lot of time (~45 min for above-mentioned
PU_D910.0.3.98f_PG1.img), be patient. - You can observe the progress by monitoring RVTMUX traces (using rvtdump from freecalypso-tools).
- Downloading takes a lot of time (~45 min for above-mentioned
- Once downloading is complete, the phone will offer to flash it immediately or postpone.
- Flashing is relatively quick (~2 min), the phone will reboot automatically.
Updated by fixeria 3 months ago · 27 revisions

